This article is a handy step-by-step guide to help you learn how to start a Shopify store in 2021. Entrepreneur and angel investor Tomas Slimas created this tutorial based on what he learned from his own ecommerce success story. In this post, you’ll find dozens of great tips that’ll allow you to focus on making sales as quickly as possible. The best part is that you can complete the whole process in about half an hour. Who knows, the next 30 minutes could mark an exciting turning point in your life as you embark on a journey as an ecommerce entrepreneur. Let’s get started.
To be honest, it took me 12 months to launch my first ecommerce store! I followed conventional strategies to begin with. I incorporated myself, looked for wholesalers, underestimated my marketing budget, developed a great looking store, manually added thousands of products… and never made a sale.
Today, after selling my ecommerce business with $3M annual sales and with seven Shopify stores on my CV, I understand what I did wrong, and found a way to fix it.
I did what most people do — I concentrated too much on creating a great looking store instead of actually trying to make a sale.
People think that if you’re launching an online business, you should do it the hard way. When you’re a first-time entrepreneur, figuring out how to start your ecommerce store seems pretty complicated.
What I have found is that it’s much more productive to learn and create along the way. Your first step is to launch your ecommerce store. You can explore ad campaigns and logo designs at a later time, like once your store is up and running.
One of my favorite quotes is: “Get going, get better.”
Below I’m sharing a detailed tutorial about how to set up a Shopify store with dozens of products in under 30 minutes. It won’t be perfect, but it’ll be exactly what you need to get started.
In this article, we’ll build a full women’s jewelry shop that sells various accessories. I strongly suggest that you follow the guide as it is written and try implementing additional features and ideas after learning how to start a Shopify business. As a side note, we also have a free dropshipping tutorial if you’re looking to jump right into product research. And we did a video on some of the most popular ecommerce terms beginners need to know, to get started. Understanding these terms will help you better navigate the tutorial below.
How to Build a Shopify Store: Creating a Shopify Store With DSers (~ 5 Minutes)
Decide On A Business Name
Picking a business name is essential, but don’t spend too much time on it. Think of something random and simple. For my women’s jewelry shop, I came up with: Utopia Jewelry, Blackwell Jewelry, and Forever Jewelry.
I recommend adding ‘store’ or ‘shop’ because you will need to find a domain name), and it’s easier to get one when there are several words in the name.
→ Click Here to Launch Your Online Business with Shopify
A useful tool for coming up with an ecommerce store name is the Shopify Business Name Generator. You can add a keyword or two that you’d like to have in your ecommerce store name, and it will provide you recommendations. Then you can simply scroll through the options and select your desired business name and launch your business.

Not only is the Shopify Business Name Generator free, but it’s also easy to use. That’s one less thing to worry about when starting your own business.
Come up with a list of 10-15 brand name ideas. And make sure the name you end up choosing isn’t trademarked and has an available .com domain address. Dot com domains tend to rank better in the search engines, and most professional brands use this domain extension as well. You can use Shopify’s Domain Name Registration tool to search for available .com domains. You can also check how much a domain costs, as well as buy and install one on your store.
Create a Shopify Account
In the old days, you had to get a server, upload an ecommerce system to it, hire someone to customize it according to your needs, and pay to maintain it. It was expensive, time-consuming, and the final result was still a slow and ineffective website.
Thankfully, Shopify has simplified the process. You can create your ecommerce store in just a few clicks, and all of the server setup and maintenance is taken care of for you.
Go to Shopify.com, click ‘start your free trial,’ enter your store name, and create your shop.

With that, you’ve taken the initial step in setting up a Shopify store. Next comes your business model.
Get familiar with Shopify Dropshipping
A traditional ecommerce model works like this: First, you buy several hundred products, then you wait for them to be delivered, stock them in your garage or a small warehouse, and when someone places an order, you ship them to your customer.
This model works well for bigger companies, but for new entrepreneurs, it can have extra costs (storage space), risks (unsold stock), and annoyances (not having a popular item in stock and ready to ship, which means you’ll miss out on potential sales).
Luckily, if you’re looking to start an online store today, there is an alternative to this model: dropshipping.
Dropshipping allows people who are just figuring out how to start an ecommerce store to get started quickly so that they can spend more time and energy on generating sales. With dropshipping, you aren’t required to hold any inventory and don’t need to worry about shipping products, which also saves you time and money.
Simply add products to your ecommerce store, and when you receive an order, pay the supplier who will then ship it directly to your customer. There is no need to pay for extra storage space and no need to worry about what to do with unsold stock.

From here onward, we’ll focus solely on the dropshipping business model because the alternative requires extra capital, time, and risk. Also, dropshipping apps make it easy to import products directly from a database within minutes. DSers is an app that allows you to import dropshipped products from AliExpress to your ecommerce store within minutes. Any orders that your store receives will be shipped directly to your customers in just a few clicks.
A safe strategy is to choose products that have high ratings, plenty of orders, and lots of good reviews. All of that indicates that they’re popular items that people like. And remember, some items can have lots of orders but average reviews and ratings. These are the products to avoid dropshipping.
How to Create a Shopify Store: Fine Tune Your Settings (~ 10 Minutes)
You’ll need to tweak a few settings to get your Shopify store functioning smoothly. In the bottom left corner of your Shopify, click the ‘Settings’ button with the gear icon.

→ Click Here to Launch Your Online Business with Shopify
First, go to ‘General’ and fill out all your store details.
Then set up payments.
Set Up Payments
I highly recommend using Shopify Payments, no matter where you’re based. It allows you to accept various forms of payments, including credit cards, Google Pay, Shopify Pay, and more. You can sign up for Shopify Payments by providing Shopify with your business information, personal details, product information, and bank account number.

You can also choose to accept payments via PayPal. Add your PayPal email address under Shopify Settings > Payments Section. Later, you can change, remove, or add additional payment options.
If you don’t have a PayPal account, register at PayPal.com. It will take about 5 minutes.
Set Up Checkout
Shopify also lets you see and modify your checkout settings. For new store owners, I recommend keeping customer accounts as optional so that customers can also check out as guests.

Additionally, consider the following choices:
- Abandoned checkouts: Shopify allows you to set up automatic reminder emails for those who reach your checkout but do not complete their purchase for any reason. Once done, Shopify will send an email 10 hours after someone abandons your checkout, when your site is still fresh in their mind.
- Customer contact: Let customers decide how they want to be reached after placing an order. Options include being contacted by text messages or email. It’s better to keep this to email only if you want to focus on creating an email list.
- Email marketing: You can provide customers with an option to subscribe during the checkout process. Later, you can reach out to them with new products or discount deals to drive more sales.
Generate Required Policies
Shopify offers handy tools for generating terms and conditions, standard privacy, and return policies. You can access them from Shopify Settings > Legal > scroll down to Refund > Privacy > Terms of Service > Shipping statements section to generate each policy sample.

Add Free Shipping Rate
If you’re looking to start an online store, I highly recommend that you offer free shipping on your products. You can set this as default from your Shopify account settings. Just remember, you will need to factor this into the price of your items if you want to earn a profit after absorbing the shipping costs.
Go to Shopify Settings > Shipping and delete all shipping zones that are “Domestic”. Next, click the “Add shipping zone.” If you’re offering free shipping, just type that in and then choose “Rest of world” if you’re ok with shipping to other countries. Now go to “Add rate” under the “Price based rates” section and select the ‘Free shipping rate.’

When everything’s set up, don’t forget to click “Save” as always.
Note: If you’re not planning to offer free shipping, be sure to let customers know how much shipping will cost. You can do this by integrating Shopify with Canada Post, USPS, and other carriers to generate live pricing. I also recommend looking into Shopify Shipping if you’re going to ship orders from Canada, Australia, or the US. The built-in shipping suite offers up to 88% savings with significant discounts on carrier shipping rates.
Set up Taxes
As an ecommerce store, you’re required to collect a sales tax from your customers. The good thing about Shopify is that it auto-calculates taxes based on the ongoing sales tax rates around the globe. Despite that, it’s a good idea to consult with a tax professional to ensure you’re charging the right amount of tax. If there are specific tax requirements for certain products in your region, you can override the default tax settings.
In Shopify, go to Settings > Taxes to set up your regions. Then you can override the defaults if specific conditions apply to your products or edit the default rates if you desire. You can also enter your tax number here. Note that Shopify doesn’t remit or file your sales taxes for you.
Create an Online Store
Shopify allows you to sell your products across multiple channels like Online Store, Facebook Store, Brick & Mortar store, etc.
Right now, we want to create an Online Store. Go to Shopify Settings > Sales Channels and add Online Store as your sales channel if it hasn’t already been added automatically.
How to Make a Shopify Store: Add Products and Content (~ 10 Minutes)
Before you import products into your store from DSers, customize them with your product names, descriptions, the right photos, and other details like assigning them to collections or adding tags. Trust me when I say that it’s a massive headache to import first and customize later. Just don’t do it.
In addition to your products, the content that you use to customize your products is crucial. This is an area that should get a lot of love from you in the future, as you test and tweak your store.
Remember, people can’t touch or hold your products. So the only way to help them get a sense of how amazing they are is to write good content that sparks their interest.
We’re going to look at some tips for customizing these things:
- Description
- Images
- About Us page
- Pricing and Inventory
- Categories
Product Description
Create a product description that provides customers with enough information to make them want to buy your products immediately.
Ask yourself:
- What problems do the customers have that my product solves?
- What do customers gain from using my product?
- What separates my products from others on the market?
Your brief description needs to answer these questions in a way that is easy to read.
Keeping it casual and positive can also help your product descriptions stand out. Also, try breaking information into short, digestible chunks. Headings, bullet points, and visuals are a great help for making this happen.
Product Images
While I strongly recommend taking product photos of your own, it’s not 100 percent necessary if you’re dropshipping. That’s because dropshipping suppliers often include decent product photos in their listings. I also recommend checking out stock photography websites like Shopify’s Burst if you’re selling a popular product. And if you’re keen to take your own images, check out our product photography course before you proceed any further.
About Us
This page on your online store needs to look unique, but this will take quite a bit of time to create. In the meantime, copy and paste one of the pre-generated ‘About Us’ pages from the list below and edit it to suit your store later.
When you write an About Us page in the future, make it personal. Tell a story about why you started the brand. Show pictures of yourself to show that there’s a human behind your eCommerce business. My favorite example of a company that has created a fantastic About Us page is Luxy Hair.
Product Pricing & Inventory
Shopify’s pricing section has three fields: price, compare at price, and cost per item. Use the second field if you want to inform customers that the product is on sale. Enter the initial price in “Compare at price” and the price after the sale in “Price.” But don’t just list a random sale; make sure you’re covering costs while still making a profit.

You can also tell Shopify that you want to track the inventory of your products. To do this, click the ‘Track quantity’ checkbox and define the number of items available to buy. So if you sell 30 units of a product, Shopify will display “‘out of stock”’ and stop people from placing orders until your suppliers refill the stock.

Create Collections
Product categories are called collections on the Shopify website. If you’re selling women’s jewelry, your collections will be (from top to bottom): Earrings, Rings, Necklaces, Watches, Bracelets, etc.
Just go to Products > Collections > Add New Collection, enter your collection name, and select your collection conditions.
Setting up collections offer a variety of benefits: including:
- Helping different shoppers quickly navigate your catalog by linking to collections of products on your homepage or in your navigation menu.
- Curating products that you want to offer on sale. It’s possible to create discounts on certain collections of products.
How to Launch an Online Store: Create Your Layout (~ 5 Minutes)
Mastering design is an integral part of the process of creating an ecommerce store. How you present your ecommerce business helps build trust with customers. Thankfully, Shopify automatically assigns a default theme to your ecommerce store, and it already looks great, so you do not need to change this unless you want to spend the time to customize it. A customized site can help enhance your brand, but it is not necessary to do that when first launching the store.
Still, if you decide you want to use a different theme, then we suggest checking out the best free Shopify themes like Debut and Simple. All themes contain sections that you can edit, rearrange, temporarily hide, or remove. You can experiment with different layouts until you’re satisfied with the outlook of your store.
Don’t buy a premium theme until you’ve generated enough sales for it to be paid for through your ecommerce business. There’s no need to make big purchases in the beginning. You can still create a beautiful website through your banner graphic, color scheme, and other visual elements. You can also use a free logo maker to create a beautiful logo for your store in a matter of minutes.

The main menu shows up on every page of your website. It’s usually displayed as items across the header, or as a list of items in the sidebar. People will probably use your main menu to find information about your store. To set up your main menu, open your Shopify admin > Navigation section > select edit ‘Main Menu’ card and list all your collections there.
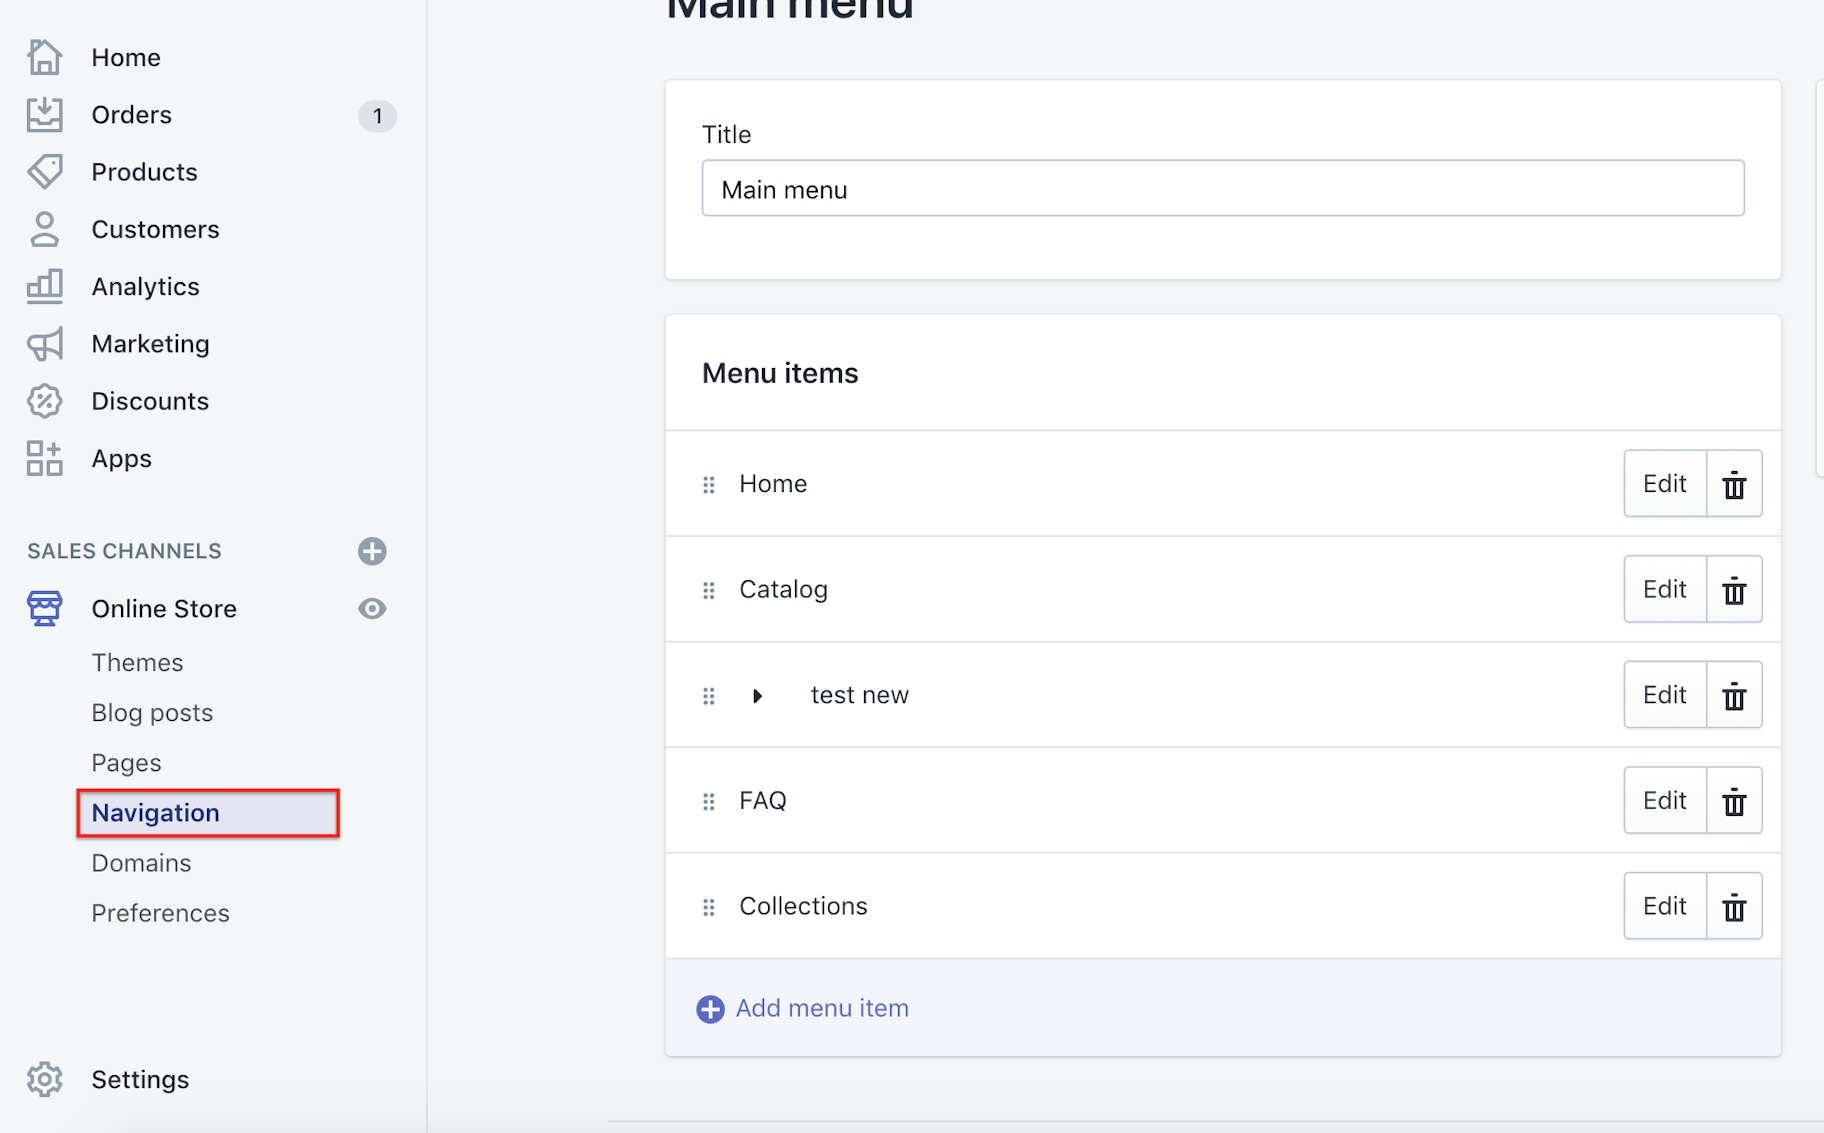

Whatever items you put in the main menu can have multiple dropdown levels to present visitors with additional options. For instance, you can group different collections under one menu item focused on men’s shoes (so you don't instantly overwhelm female shoppers with products that aren’t for them).
Upload Main Banner
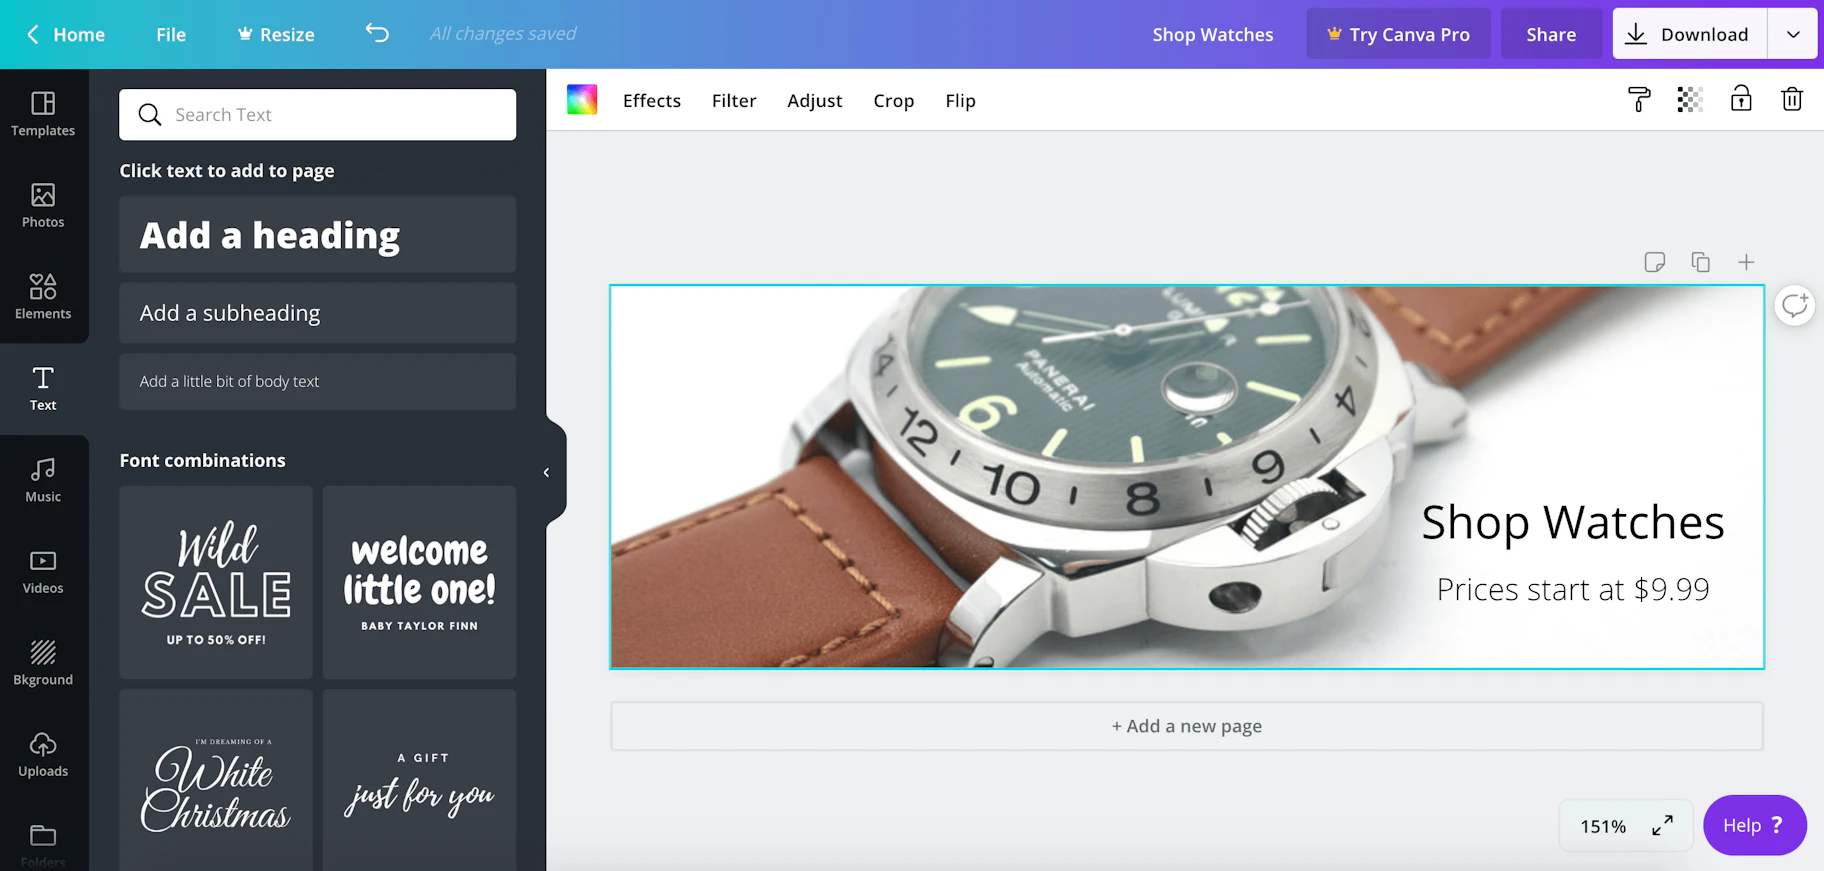
You can create a cool looking banner in just a few minutes. You can search on Google for the term “banner editing tools” or click here: Canva.com. Select banner dimensions (1200x360px), upload an image of one of your products, choose your background, insert a few lines of text, add a “Buy Now” button, and you’re finished.
You can also use Canva’s templates to design something visually appealing. They have shapes you can incorporate into your design to make things pop. Don’t be afraid to look through Canva’s templates for inspiration to design a banner that wows. Their website is user-friendly and allows even someone with little design experience to create a unique banner.
You can now insert this banner into your ecommerce store by going to Online Store > Themes > Customize Theme > edit Homepage Slideshow.
Editing Featured Products
If you navigate to Customize Theme > Home page > Featured Products; you can choose a collection for featured products. If you create a collection, as you did earlier, name one featured, use tags called ‘Featured.’ Every time you add a new product that you want to showcase, add the ‘Featured’ tag to the tags section, and it will automatically appear on the Home Page under ‘Featured.’
You can set up a footer in Online Store > Navigation > Add menu. Write “Footer menu” as the title and then decide what you want to see in your footer. I usually hide ‘Latest News column,’ because we haven’t created any blog posts yet.
Now go to Online Store, Navigation section, select Footer Menu, and list all the page you created before:

Conclusion
Congratulations, you’ve just created your first Shopify ecommerce store!
Although it didn’t take a long time, it’s still an excellent achievement. You now own an online store and can officially call yourself an ecommerce entrepreneur.
You should also remember that you’ve only figured out how to start an ecommerce store, now you need to figure out how to take it to the next level. Owning an ecommerce business is about trying to improve your sales, customer service, customer experience, and, most importantly, yourself.
And so the question now is, how to start a successful Shopify store? Well, you’ll need to focus your energy on marketing your store via ads, content creation, and building an audience on social media. When combined, those three things can have a powerful impact on your brand in the long-term. Right now, you need to put your brand out there for everyone to see as people won’t just magically find you. Just as Shopify and DSers make running your ecommerce business easier than ever before, there are plenty of accessible marketing tools and tutorials available online. We recommend using Facebook Ads to boost your sales. Remember, it’s best to jump right into this aspect of your eCommerce business because learning by doing will be more effective than coming up with an elaborate marketing plan right from the onset.
Write down a list of things you want to achieve with your ecommerce business, and begin the learning process. Begin by committing one hour every day to improving your Shopify store so that you can further edit your website, find new ways to boost sales, and continue learning how to grow your ecommerce business.
With hard work and a sales push on your side, the possibilities are endless. Focus on why you started this ecommerce business in the first place and let that drive your determination to succeed. No matter where your ecommerce adventure takes you, rest assured that you’ll learn so much more about yourself and witness your levels of creativity, determination, and perseverance reach new heights.
Summary: How to Start a Shopify Store in 2021
- Select a business name.
- Create a Shopify account.
- Add products from DSers.
- Set up payments.
- Customize your checkout.
- Generate the necessary policies.
- Add free shipping rate.
- Set up taxes.
- Create an online store.
- Write product descriptions.
- Add product images.
- Create an About Us page.
- Decide product pricing and inventory.
- Create collections.
- Choose a Shopify theme.
- Create the main menu.
- Upload the main banner.
- List featured products.
- Set up your footer.
- Launch your Shopify Store
Want to Learn More?
- 50 Ecommerce Tips for New Entrepreneurs
- Ecommerce Roadmap: How to Start Ecommerce Business That Will Succeed
- Everything You Need to Know About Dropshipping in One Resource
- The Ultimate Guide to Starting Your First Ecommerce Business
Is there anything else you’d like to know more about and wish was included in this article? Let us know in the comments below!